
[Node-Red] cron 을 활용한 node-red 스케줄링하기
node-red-cron-plus 를 활용하면 수동& 자동(동적) 스케줄링이 가능합니다.
수동 스케줄링은 UI 상에서 선택만 해주면 되지만 동적 스케줄링 같은 경우 json 형식을 맞춰줘야합니다.
환경 구축
우측 상단에서 [팔레트 관리] 클릭
"설치가능한 노드" 에서 node-red-contrib-cron-plus 검색
콘솔 창에서 npm 명령어로도 설치가 가능합니다.
npm install node-red-contrib-cron-plus
🚩들어가기 전에...cron 명령어 이해하기
📆 cron 명령어는 시간 기반 작업 스케줄링 표현식이에요.
리눅스 cron 이랑 아주 조금 다르고 대부분 비슷합니다.
🔷기본 구조 (6자리 포맷)
* * * * * *
초 분 시 일 월 요일
| 필드설명 | 예시 | 값 |
| 초 (0-59) | 초 단위 | 0, */10 |
| 분 (0-59) | 분 단위 | 30, */5 |
| 시 (0-23) | 시간 (24시간제) | 9, 18 |
| 일 (1-31) | 날짜 | * |
| 월 (1-12) | 월 | * |
| 요일 (0-7) | 0=일요일, 1=월... | *, 1-5 |
🔷 자주 쓰는 예제
| 목적 | cron 표현식 | 설명 |
| 매초 | */1 * * * * * | 1초마다 실행 |
| 매분 | 0 * * * * * | 매분 0초마다 |
| 매일 아침 9시 | 0 0 9 * * * | 오전 9시 정각 |
| 매일 저녁 6시 | 0 0 18 * * * | 오후 6시 정각 |
| 매 10초마다 | */10 * * * * * | |
| 평일 오전 9시 | 0 0 9 * * 1-5 | 월~금 오전 9시 |
| 매월 1일 자정 | 0 0 0 1 * * | 매월 1일 00:00 |
✅ Node-RED에서 사용 시 팁
- cron-plus 노드는 초 단위 포함된 6자리 포맷을 사용합니다.
- *는 "매번"이라는 의미예요.
- /는 "마다" → */5는 5마다
- ,는 나열 → 0,30은 0분과 30분
- -는 범위 → 1-5는 월~금
수동 스케줄링
설치가 완료 되었으면 좌측 노드 목록에 cronplus 노드가 생성됩니다.
하나 만들어서 노드 속성을 살펴보겠습니다.
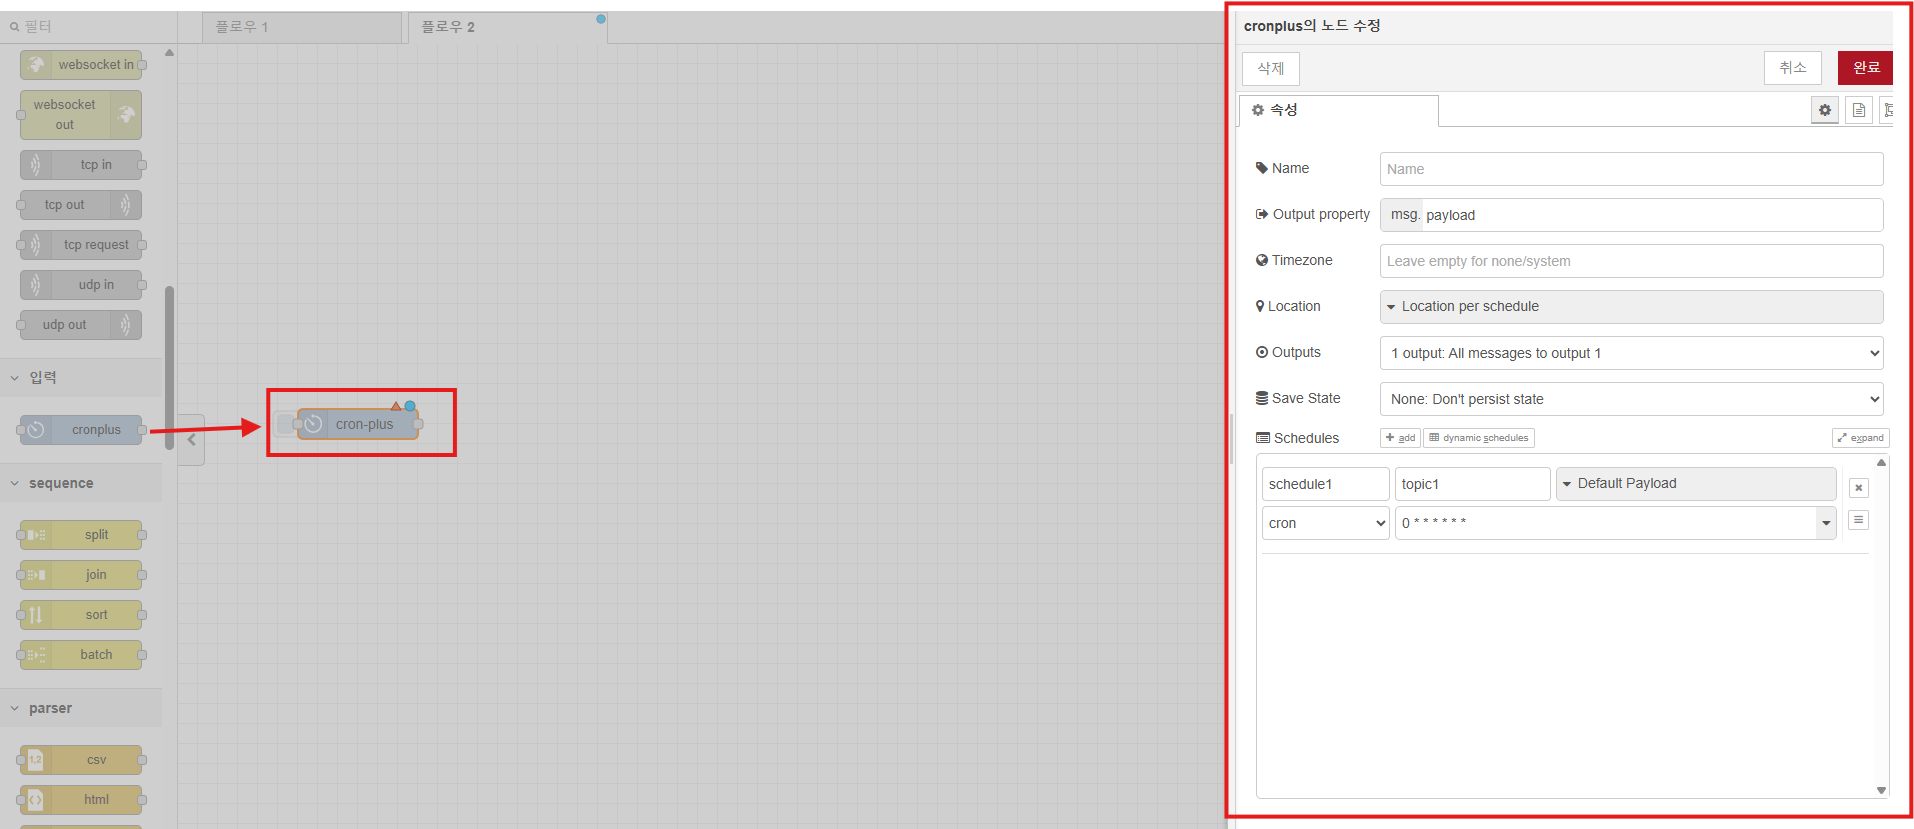
Name: 노드이름
Output property: 스케줄을 실행할 때 성공여부를 보내줄 수 있는 반환값 설정 (기본 msg.payload)
Timeline: 자동으로 시스템 시간으로 설정 되나, 수동으로 설정할 수도 있습니다.
Location: 말그대로 장소
Outputs: output property 를 통해 값을 보낼 때 여러개 스케줄을 하나로 묶어서 처리할 건지, 독립적으로 반환 시킬 껀지 결정하는 부분
State Save: 스케줄 여부를 DB나 log 파일 등 저장할 지, 어떻게 저장할 지 정할 수 있음(Default: None)
스케줄 설정
아까 상단의 cron 설명의 cron 표현식을 직접 입력해줘도 되고,
"easy expression builder" 활용해서 딸깍해도 됩니다 ㅎㅎ.
자동(동적) 스케줄링
Node-RED에서 사용하는 node-red-contrib-cron-plus 노드는 단순한 시간 트리거뿐만 아니라, 동적으로 명령(command) 을 주어서 스케줄을 추가/삭제/수정/정지/조회할 수 있게 해주는 강력한 도구입니다. 동적 스케줄링일 경우 json 표현식을 맞춰줄 필요가 있습니다.
우선 예제 코드
[
    {
        "id": "3be008dd429a2860",
        "type": "comment",
        "z": "32b24fb3fa1d785e",
        "name": "cron 테스트",
        "info": "",
        "x": 290,
        "y": 1020,
        "wires": []
    },
    {
        "id": "bcda75bf.c394a8",
        "type": "inject",
        "z": "32b24fb3fa1d785e",
        "name": "remove-all",
        "repeat": "",
        "crontab": "",
        "once": false,
        "onceDelay": 0.1,
        "topic": "remove-all",
        "payload": "true",
        "payloadType": "bool",
        "x": 300,
        "y": 1100,
        "wires": [
            [
                "a2299126.371a3"
            ]
        ]
    },
    {
        "id": "a2299126.371a3",
        "type": "cronplus",
        "z": "32b24fb3fa1d785e",
        "name": "",
        "outputField": "payload",
        "timeZone": "",
        "storeName": "file",
        "commandResponseMsgOutput": "output1",
        "defaultLocation": "",
        "defaultLocationType": "default",
        "outputs": 1,
        "options": [],
        "x": 520,
        "y": 1100,
        "wires": [
            [
                "9aacf955.869d18"
            ]
        ]
    },
    {
        "id": "b4d98f36.29cea",
        "type": "inject",
        "z": "32b24fb3fa1d785e",
        "name": "add schedule",
        "props": [
            {
                "p": "payload"
            },
            {
                "p": "topic",
                "vt": "str"
            }
        ],
        "repeat": "",
        "crontab": "",
        "once": false,
        "onceDelay": 0.1,
        "topic": "test!!!!",
        "payload": "[{\"command\":\"add\",\"name\":\"every 6\",\"expression\":\"*/6 * * * * * *\",\"expressionType\":\"cron\",\"payloadType\":\"default\",\"limit\":3}]",
        "payloadType": "json",
        "x": 310,
        "y": 1060,
        "wires": [
            [
                "a2299126.371a3"
            ]
        ]
    },
    {
        "id": "85038c59.6f9e3",
        "type": "inject",
        "z": "32b24fb3fa1d785e",
        "name": "status-all",
        "repeat": "",
        "crontab": "",
        "once": false,
        "onceDelay": 0.1,
        "topic": "status-all",
        "payload": "",
        "payloadType": "date",
        "x": 300,
        "y": 1140,
        "wires": [
            [
                "a2299126.371a3"
            ]
        ]
    },
    {
        "id": "9aacf955.869d18",
        "type": "debug",
        "z": "32b24fb3fa1d785e",
        "name": "",
        "active": true,
        "tosidebar": true,
        "console": false,
        "tostatus": false,
        "complete": "true",
        "targetType": "full",
        "statusVal": "",
        "statusType": "auto",
        "x": 650,
        "y": 1100,
        "wires": []
    }
]
해당 코드를 불러오면 하단과 같이 노드들이 생성됩니다.
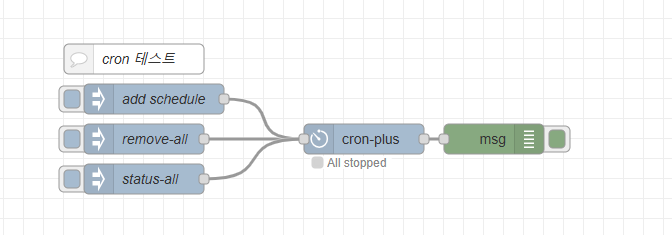
add schedule 노드를 클릭해서 json이 어떻게 구성되어있는지 확인해봅시다.

msg.payload와 msg.topic 이 구성되어 있는데 해당 형식을 맞춰줘야합니다.
msg.topic으로 보낼 값이 없어서 삭제해버리면 스케줄러에 업로드가 안되더라고요...해당 모듈 버그 일듯합니다.
add shedule json 을 살펴보면
[
    {
        "command": "add",
        "name": "every 6",
        "expression": "*/6 * * * * * *",
        "expressionType": "cron",
        "payloadType": "default",
        "limit": 3
    }
]
name, expressiontype,payloadTpye 은 직관적으로 이해가 되고, expression은 cron 표현식을 활용하면 되겠죠. \
limit은 테스트 데이터이가 3회로 설정해놨습니다.
중요한건 command인데 스케줄러 노드에 어떤 명령을 실행할지 결정하게 됩니다.
하단의 표를 참고해서 적절한 command를 넣어주면 됩니다, command 별로 요구하는 json 값이 다 다르기 때문에 표를 참고하지고 json 형식을 맞춰주면 됩니다.
⚙️cron-plus 노드 주요 Command 정리표
| Command | 설명 | 필수 | 필드예시 |
| "add" | 새 스케줄 추가 | name, expression, payload | {"command":"add", "name":"fanOn", "expression":"0 0 9 * * *", "payload":true} |
| "remove" | 특정 스케줄 삭제 | name | {"command":"remove", "name":"fanOn"} |
| "start" | 일시 정지된 스케줄 재시작 | name | {"command":"start", "name":"fanOn"} |
| "pause" | 스케줄 일시 정지 | name | {"command":"pause", "name":"fanOn"} |
| "describe" | cron 표현식 해석 (설명용) | expression | {"command":"describe", "expression":"0 0 9 * * *"} |
| "list-all" | 현재 등록된 모든 스케줄 반환 | 없음 | {"command":"list-all"} |
| "list" | 등록된 특정 스케줄 반환 | name | {"command":"list", "name":"fanOn"} |
| "fire-once" | 특정 스케줄 이름으로 한 번만 즉시 실행 | name | {"command":"fire-once", "name":"fanOn"} |
| "clear-all" | 모든 스케줄 완전 삭제 | 없음 | {"command":"clear-all"} |
배포 후, cron-plus 노드를 확인하여 동적 스케줄링이 잘 되어있는지 확인해봅시다.
글씨가 작지만 속성 창에서 "dynamice schedules"에서 확인이 가능합니다.

네 잘 들어오는게 확인이 되죠.

마무리
해당 기능을 이용하여 서버 단에서 장치로 신호를 송신하는 것을 자동화 할 수 있습니다.
예를 들어, 오전 9시가 되면 조명, 에어컨을 킨다던가, 매 시간마다 센서로부터 값을 읽어온다던가 등등..
한국어나 영어나 자료가 많이 없는 것 같은데 활용도 높은 기능을 찾게 되면 또 포스트 하겠습니다.
참고자료
https://www.npmjs.com/package/node-red-contrib-cron-plus
node-red-contrib-cron-plus
A flexible scheduler (cron, solar events, fixed dates) node for Node-RED with full dynamic control and time zone support. Latest version: 2.1.0, last published: 2 years ago. Start using node-red-contrib-cron-plus in your project by running `npm i node-red-
www.npmjs.com
https://flows.nodered.org/flow/79a66966a6cc655a827872a4af794b94
Dynamic cron schedules / timers via dashboard control (flow) - Node-RED
Dynamic cron schedules / timers via dashboard control About This flow demonstrates how you can add, remove, pause, resume CRON schedules / timers via dashboard control at runtime with node-red-contrib-cron-plus. Requirements... Install node-red-contrib-cro
flows.nodered.org
https://discourse.nodered.org/t/cron-plus-dynamic-schedules/42214/6
Cron-plus - dynamic schedules
Ah Ok, I can see how your example above works, and can now piece it together with the example/readme. Thank you. Is there a reason why some of the payload commands also need a topic? For example; {"command":"remove-all-dynamic"} needs topic delete-all-dyna
discourse.nodered.org
'Computer Science' 카테고리의 다른 글
| Node-RED란? (Node-RED 환경 구축 & 세팅) (0) | 2025.03.27 |
|---|
